Hello. This is InfoTherapy, prescribing healthy information.
While working in the therapy room, I see countless cases where patients who left the hospital smiling brightly after having their casts removed returned just a few weeks later, pale and distraught, knocking on the manual therapy door. “Doctor, they say the bone has fully healed, but why won’t my joint move? My arm (or leg) doesn’t feel like my own; it feels like a block of wood.”
There is a major misconception that fracture patients have. They believe that once the broken bones fuse, all treatment is over. However, the real battle begins the very moment the cast is removed. This is because the joints, muscles, and even the skin, which were tightly bound for months to help the bones heal, have hardened like stone.
Today, from the perspective of a manual therapist with 10 years of experience, I will candidly prescribe a realistic and grueling post-fracture rehabilitation routine that you can do at home for those who cannot visit the hospital every day. I warn you, this process is very painful and arduous. However, if you read this article to the end and put it into practice, you will surely be able to regain the freedom of your daily life.
The Golden Time of Rehabilitation and the Aesthetics of 'Waiting'
Before I explain the basic principles of rehabilitation, there is a most important prerequisite that must never be overlooked.
Until the attending physician gives the signal, “You may move now.”
Fracture patients must unconditionally 'wait' until the bone has safely healed. If you try to remove the cast and move forcefully before the bone has fully healed, either out of a desire to recover quickly or because you feel stifled, an irreversible catastrophe will occur.
If the misaligned bones heal abnormally or the surgical site where the pins were inserted separates, the surgery must be repeated from the beginning. Ensure thorough immobilization during the fixation period. Furthermore, you must begin rehabilitation without delay on the very day the orthopedic surgeon reviews the X-ray and declares, "The bones have fully healed, so you may start rehabilitation.".
The reason skin wrinkles disappeared (tissue adhesions)
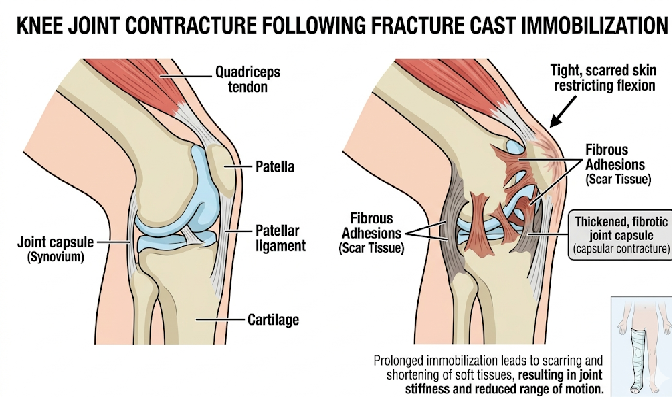
When you take off a cast after wearing it for a long time, you will witness a surprising phenomenon. Aside from the fact that you have atrophied and become emaciated, the skin around the joints has become taut, so not a single 'wrinkle' is visible.
For us to bend and straighten our joints, the skin, muscles, and joint capsules must stretch loosely. However, as movement ceases during the immobilization period, these tissues become entangled and contracted (adhesion and contracture), losing their elasticity like a rubber band. Rehabilitation is the process of creating wrinkles and stretching these taut skin and stiff joints again. The reason they absolutely do not loosen up after moving just once or twice is precisely because of this stubborn 'adhesion'.

A Manual Therapist Reveals the 4-Step 'Solo Rehabilitation' Routine
The ideal approach is to visit a professional manual therapy clinic every day and receive assistance from a therapist. However, if you face practical constraints regarding cost and time, you must manage the condition yourself at home. Here is a 4-step practical routine to loosen up your stiff joints in just one hour a day.
Step 1: 'Warm Compress' to Melt Hardened Tissue (Caution: Exceptions apply)
Before starting rehabilitation, you need to soften stiff muscles, ligaments, and skin by supplying warm blood. Please apply a hot pack or warm towel for about 15 minutes.
-
Caution: If the surgical or fracture site is red or feels hot to the touch, it indicates acute inflammation, so you must absolutely not apply a warm compress. Skip the warm compress in this case.
Step 2: 'Active ROM' Moving with My Own Power‘
Now, try moving your warmed-up joint on your own. Bend it as much as you can, and straighten it as much as you can. Naturally, it won't move like it did before the cast, and the range of motion will be very limited. That is okay. The important thing is that this is a warm-up process where your brain sends motor nerves to your joint to turn a stiff machine on your own. Move sufficiently within the limits of pain to stimulate the secretion of synovial fluid.
Step 3: Cost-effective 100%, Myofascial Release Massage Using Tools
Loosening the surrounding muscles before you start bending your joints allows them to bend much more smoothly. While massaging with your hands is helpful, it requires a lot of effort. For this, there are practical tools recommended by manual therapists.
-
V-line Face Roller: Use a plastic face roller that you can buy at Daiso or online for 2,000 to 3,000 won. Gently rolling it over stiff arm and leg muscles makes for an excellent massager.
-
Plastic/Stainless Steel Cup (Rubbing while clothed): It is also good to rub the muscles using the round, smooth bottom surface of a water bottle or cup. However, since doing this on bare skin can cause friction burns, be sure to wear thin clothing and rub gently with a sliding motion.
Step 4: The tearful 'Passive ROM' (Passive ROM)
Once you have sufficiently loosened your muscles, it is time for the real game. Go beyond the limits of bending on your own, you must use your other healthy hand or a family member's help to forcibly press down on the joints to bend and straighten them.
-
Checking your target range: Do not bend blindly. Instead, search the internet for "normal range of motion" or "normal ROM" along with the injured area. For example, if you search for "elbow normal ROM," angles accompanied by diagrams will appear. That angle serves as the guideline for the target range of motion you need to achieve.
-
The 10-Second Rule: Just before you scream, forcefully bend your joints as far as you can hold. Then, without stepping back, grit your teeth and hold for exactly 10 seconds. After holding for 10 seconds, slowly straighten your joints while resting for another 10 seconds, and repeat the process.
-
Repeating this bending and holding process for about 20 to 30 minutes to advance the range by 1mm at a time constitutes one cycle.
One hour a day, the terrible aftermath you will face if you give up
If you complete one cycle of the hot compress, active movement, tool massage, and passive bending described above, approximately one hour will have passed in no time.
Cold compresses to manage pain at least twice a day
You must repeat this hellish one-hour routine for a minimum of two and a maximum of four cycles a day. It is painful and exhausting enough to bring tears to your eyes, but it is proof that your hardened skin and joint capsules are stretching. If your joints swell, burn, and hurt intensely after exercising, do not endure the pain; apply a cold compress (ice pack) for about 15 to 20 minutes. It is excellent for relieving acute pain and swelling. Additionally, if you have anti-inflammatory painkillers prescribed by the hospital where you had surgery, taking them before and after exercise to reduce pain while increasing the intensity of your rehabilitation is a very wise approach.
“The trap of thinking, "This should be enough."
The most unfortunate patients are those who proceed with rehabilitation for about 70 to 80 minutes, but stop because they decide on their own that they do not experience significant discomfort in their daily lives.
Please remember this. If you stop rehabilitation midway, the joint will not remain in that state but will instead contract and stiffen again for the worse. If you return to the hospital after two or three years with a joint that has completely hardened like stone, you will have to undergo general anesthesia to break the joint and separate the adhesions, or endure treatment that is several times longer and more painful than the initial stages.
In the beginning, when your joints are less stiff, you must grit your teeth and push through. If you absolutely cannot endure the pain that feels like your flesh is being torn apart on your own, you must visit a hospital and entrust your body to the therapist's firm touch. If you avoid it because it hurts, you will regret it for the rest of your life.
Summary and Infotherapy Prescription
-
Rehabilitation after a fracture must begin only after the attending physician confirms bone union, and it is a very painful process of breaking down adhesions between the hardened joint capsule and the skin.
-
When doing this at home, repeat the 4-step routine of warm compress ➔ active movement ➔ tool massage ➔ passive bending (ROM extension) 2 to 4 times a day for at least 1 hour.
-
If the pain is severe, use cold compresses and anti-inflammatory painkillers, and you must never compromise or give up halfway until your target range of motion is fully restored.
Returning to the ordinary daily life you had before your injury is never easy. However, the angle of your joints increasing by 1mm every day is the fruit of your sweat and tears. Infotherapy sincerely encourages you not to give up today and to breathe life into your stiff joints.
This has been Infotherapy, prescribing healthy information. Thank you.
See other posts
Chondromalacia: Why It Occurs Even Without Exercise (5 Minutes of Daily Running for Beginners)
Solve Your Parents' Knee Pain with Just One Thermos?
References (References with Links)
-
Handoll, H.H., et al. (2011). “Interventions for treating wrist fractures in children.” Cochrane Database of Systematic Reviews.
-
Research Topic: The Essential Effects of Early Rehabilitation Exercises and Active/Passive Range of Motion (ROM) Recovery on Return to Daily Living After Immobilization Period in Children and Adults Following Fractures.
-
-
Bleakley, C. M., et al. (2012). “Cryotherapy for acute bursa, joint, and soft tissue inflammation.” Sports Medicine.
-
Research Topic: Clinical guidelines on the effects of cryotherapy and the correct application time (15–20 minutes) for joint pain and inflammation occurring after high-intensity rehabilitation exercise.
-
-
Gunn, L. J., et al. (2019). “Instrument-assisted soft tissue mobilization: A systematic review and effect-size analysis.” Journal of Athletic Training.
-
Research Topic: Demonstration of the biomechanical effects of instrument-assisted soft tissue mobilization (IASTM, instrument massage) on improving joint range of motion (ROM), reducing pain, and alleviating myofascial adhesions.
-